Finding your place on a sheet: go to a cell, keep the headers in sight
Every sheet has a grid border: numbered columns along the top, lettered rows down the side. People use it to talk about a drawing — "the contactor in B13", "the report to 4-B7" — and QElectroTech uses it too, in cross-reference and sheet-report labels.
This page covers three ways of using that grid while you work, and then the zoom and pan controls for getting around a sheet:
- Going to a cell — type
B13, or4-B7for a cell on another page, and the view zooms there. - Keeping the headers visible — when you zoom in, the column numbers and row letters stay at the edges of the view instead of scrolling away.
- Showing the cell limits — faint dashed lines across the drawing where each column and row ends.
- Moving around a zoomed-in sheet — the zoom commands, the mouse wheel and middle button, and a key that brings the point under the mouse to the middle of the window.
The first two were asked for in issue #1034.
1. Going to a cell
Press Ctrl+G (Édition → Atteindre un élément). The same popup that finds an element by its label also understands cell references:
- Type the cell, for example
B13. - The list offers Case B13 — or, for a cell on another page, Sheet 4 (that page's title), case B7.
- Press Enter. The view zooms onto that cell, with one cell of margin on every side, so you see the cell and its neighbours.
Escape closes the popup without moving anything.
What you can type
Case does not matter, and spaces are ignored.
| You type | Goes to |
|---|---|
B13 |
row B, column 13, on the page you are on |
4-B7 |
row B, column 7, on page 4 |
4B7, 4 B7, p4b7, P4-B7, 4/B7 |
the same as 4-B7 |
AA3 |
row AA — sheets with more than 26 rows continue AA, AB, … |
4-B7 is exactly what a cross-reference or a sheet report prints with the
default label %f-%l%c (see Linking wires across pages).
So when a report arrow says 4-B7, you can type those four characters into
Ctrl+G and land on its partner. If you changed the label format in your
project, type the page number and the cell in this order anyway.
How the page number is counted
The page number is the sheet's position in the project: the first tab is
1, the second is 2, and so on — the same number %f prints. It is not the
sheet's own label from the title block (%F), which you may have set to
something like =A1 or 12a.
Move a sheet, and its number changes — exactly as the cross-references in the project renumber when you do.
Columns that start at 0
If Configuration → Configurer QElectroTech → Général →
Numéroter les colonnes de cartouche à partir de 0 is on, the first column is
0, and that is how you type it: B0 is the first cell of row B. The popup
always reads cells the way your border draws them.
When the popup offers nothing
| You typed | Why nothing is offered |
|---|---|
B40 on a sheet with 17 columns |
the cell is outside that sheet's border |
9-B4 in a project with 3 sheets |
there is no page 9 |
P3 |
this is row P, column 3 on the current page. If the sheet has no row P, nothing is offered. A page number always needs a cell after it — there is no "go to page 3" on its own |
When a label and a cell look the same
An element labelled K1 and cell K1 can both match K1. The popup keeps
the element first when its label matches exactly, so Enter still jumps to
the element, as it did before this feature; the cell is listed second —
press Down, then Enter.
Only an exact match counts. An element labelled -F1 does not match F1
exactly, so typing F1 lists the cell first and -F1 after it.
2. Keeping the row and column headers visible
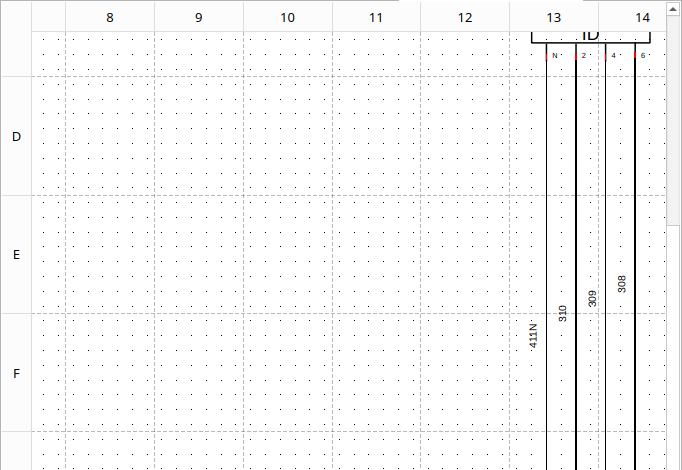
Zoom in on a large sheet and the border's column numbers and row letters scroll off the screen, so you can no longer tell which cell you are looking at. Turn on Affichage → Garder les en-têtes visibles (View → Keep headers visible) and two bars appear along the top and the left of the drawing area:
- The top bar repeats the column numbers, each one above its column.
- The side bar repeats the row letters, each one beside its row.
They follow every scroll and zoom, so the labels always sit over the cells you are looking at.
Only when you need them
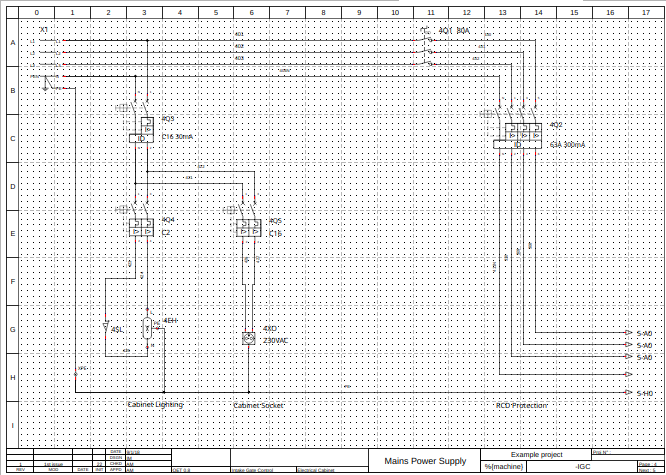
Each bar hides itself while the sheet's own column (or row) header is fully on screen, and appears once zooming or scrolling pushes that header out of sight. Zoomed out on a whole sheet you therefore see only the sheet's border, not the same numbers twice. The two bars work separately: scroll sideways and the side bar comes on while the top one stays hidden.
When a bar comes or goes the drawing does not jump: the bar simply covers or uncovers the edge of the view.
How the bars behave
| Default | Off. Turning it on is remembered the next time you start QElectroTech |
| Size | Always the same thickness on screen, whatever the zoom — they do not grow as you zoom in |
| Zoomed far out | When the cells get narrower than their numbers, only some labels are written: every 2nd, 5th, 10th… column (0, 5, 10, …) and every 2nd, 5th… row (A, F, K, …) |
| Beyond the sheet | The bars are blank past the edge of the border |
| Sheets with a header hidden | If a sheet's properties hide its row or column header (Afficher les en-têtes under Lignes or Colonnes), the matching bar is hidden on that sheet too |
| Dark colour scheme | The bars use the application's colours, so they follow a dark scheme |
| Turning it on or off | The drawing area shrinks or grows by the bars' thickness; the drawing keeps its place on screen |
| Windows 11 style | A shadow of the old labels could be left behind when zooming with the wheel. Fixed by PR #1047 |
| Sheet with its row letters hidden | The top bar was one header width out of line with the columns. Fixed by PR #1047 |
What they are not
The bars are part of the window, not of the drawing. They are never printed and never appear in a PDF, PNG, SVG or DXF export — what prints is the sheet's own border, exactly as before.
Limitations
- After changing Numéroter les colonnes de cartouche à partir de 0, the bars show the new numbering at the next scroll or zoom.
- With two QElectroTech windows open, the menu item turns the bars on or off in the window it was used from only. (Afficher la grille behaves the same way.)
3. Showing the cell limits across the drawing
The headers tell you which cell you are in; zoomed into the middle of a sheet they don't show where it ends. Turn on Affichage → Afficher les limites des cases (View → Show the cell limits) and a faint dashed line is drawn across the drawing at every column and row limit — see both screenshots above.
| Default | Off. Turning it on is remembered the next time you start QElectroTech |
| Look | Thin, faint and dashed, always one pixel wide whatever the zoom, so they don't read as wires |
| Stacking | Drawn under everything: symbols, wires and texts always sit on top |
| Sheets with a header hidden | If a sheet hides its column header, the vertical lines are not drawn on it; the same for its row header and the horizontal lines |
| Dark colour scheme | Toned like the grid dots, so they stay faint on a dark background |
| With the header bars | Independent: use either, or both |
Like the bars, the lines are part of the view, not the drawing: they are never printed and never appear in a PDF, PNG, SVG or DXF export.
4. Moving around a zoomed-in sheet
Zoom commands
All of these are in the Affichage (View) menu, at the bottom. Every shortcut can be changed in the shortcut editor.
| Command | Default shortcut | What it does |
|---|---|---|
| Zoom avant / Zoom arrière (Zoom in / out) | your platform's standard zoom keys — usually Ctrl++ / Ctrl+−, not the bare + and − keys | one step in or out, about 15 % |
| Zoom sur le contenu (Zoom on content) | Ctrl+8 | fits everything drawn on the sheet into the window, ignoring the sheet border — what other CAD programs call zoom extents |
| Zoom adapté (Fit) | Ctrl+9 | fits the sheet border into the window |
| Pas de zoom (No zoom) | Ctrl+0 | back to 100 % |
| Centrer sur le curseur (Centre on cursor) | none — see below | brings the point under the mouse to the middle of the window, keeping the zoom |
The zoom keys and the mouse wheel zoom around the mouse pointer: the point under the pointer stays where it is while everything else grows or shrinks. A quick way across a large sheet is therefore to zoom out, put the pointer on the part you want, and zoom back in.
Mouse and trackpad
| Action | Result |
|---|---|
| Mouse wheel | zoom in and out |
| Ctrl+mouse wheel | scroll the sheet up and down, without zooming |
| Middle button held and dragged | pan: the sheet follows the mouse |
| Mode Visualisation (hand icon on the toolbar, or Affichage → Mode Visualisation) | the left button pans too; nothing can be selected or edited until you switch back to Mode Selection |
A trackpad sends its two-finger scroll as mouse-wheel turns, so with the settings above a two-finger swipe zooms. Tick Utiliser les gestes du pavé tactile (Use trackpad gestures) in Configuration → Configurer QElectroTech → Général and it changes to:
| Action | Result |
|---|---|
| Two-finger swipe | scroll the sheet in any direction |
| Ctrl+two-finger swipe | zoom in and out |
The sheet stops scrolling at its border. To zoom out further than the whole sheet, tick Autoriser le dézoom au delà du folio (Allow zooming out beyond the sheet) on the same page.
Centre on cursor
Affichage → Centrer sur le curseur scrolls the sheet so the point under the mouse becomes the middle of the window. The zoom does not change. Point at the part of the drawing you want to look at next, press the key, and it comes to the middle; press it again somewhere else to keep going. It is the centre on cursor key of KiCad and similar programs, and was asked for in forum topic 3199.
It has no key until you give it one. Most single letters are already used or would get in the way of typing, so it ships without one. To set one:
- Configuration → Configurer QElectroTech, page Raccourcis (Shortcuts — see Preferences §4).
- Type
centrerin the filter box and pick Centrer sur le curseur under Éditeur de schémas. - Give it a key — for example C. If another command already uses that key, the page tells you which one.
| Situation | What happens |
|---|---|
| Pointer over the sheet | the point under it moves to the middle of the window |
| Pointer near the sheet border | the sheet scrolls as far as its border allows, so the point ends up as close to the middle as it can get |
| Pointer outside the drawing area — for instance, choosing the command from the menu with the mouse | nothing |
See also
- Linking wires across pages — the
%f-%l%creport labels you can type into Ctrl+G - Variables & formulas —
%f,%l,%cand the other position variables - Keyboard-only control — every other shortcut, including Ctrl+G for elements
- Preferences reference — the other settings pages
- 3D mouse — panning and zooming around a sheet with a SpaceMouse
